This tool allows the AnyLogic user to construct a set of sorting conveyor networks automatically by using datapoints defined in an Excel configuration file. This approach offers flexibility, allowing for effortless modifications and additions of various components such and loop conveyors, transfer tables, spurs, and more. Additionally, this tool allows you to connect through a TCP/IP protocol with any external tool to read the data associated to the current position of the agents in the conveyor network, and send information back to this tool for re-routing and re-defining priorities.
Check this library in action in the following link: https://cloud.anylogic.com/model/34810d29-661b-4d2c-95dd-46ecd95c221b
You can also check the video demo here:
https://youtu.be/fQwLOUNW2s4
How to Download
You can get the free version with limitations here, along with all the important files you will need:
https://github.com/noorjax/sorting_conveyors
You will need a license to get full functionality. The free version is limited to a maximum of 1 hour of simulation time.
How to get a license
To get a license, follow the instructions in the following link:
https://noorjax.com/2024/09/10/getting-a-license-for-a-library
The price for this library:
- Commercial use – 1 year: €3,000
- Support for implementation: €1,000
Our prices can change at any time without notice
Documentation
This library has been tested with AnyLogic 8.9.1. Previous versions will not work.
First thing you want to do with this library, is to build your conveyor networks and to do that, you will define the physical location of conveyors, spurs and transfer tables in Excel.
Excel Configuration File
The Excel configuration file contains many tabs. We will discuss what each one of these tabs do.
License
On this tab you will write down the token that you will receive when you get the paid version of this tool. If you don’t have a token, don’t worry you can still use the library in its limited version.
General
- length unit: can be in Meter or Feet. This will be the unit of length for all parameters that have “in length units” suffix. This will rule all distances, speeds and accelerations.
- python path (optional): Here you will add your python program location path on your computer, which will be used to show a preview of the conveyor network. If you have this enabled correctly, you will be able to click the “show 3D plot” button on the Conveyors config tab to see a preview of the network you are building in Excel before you use it in AnyLogic. If you are new with python, we would recommend you download Anaconda Navigator (you can find online) and use the python path from anaconda.
Pre-visualization python file for the conveyor network (Show 3D Button)
To know how the conveyor network is looking before running it in AnyLogic, you can press the button “show 3D plot” in the Conveyors config sheet in the configuration excel file. But before pressing the button you must configure some things:
- The preVisualizationScript.py is in the same folder as the configuration excel file.
- To successfully run the “preVisualizationScript.py”, it is crucial to install the necessary Python libraries. These libraries enable various functionalities such as data manipulation, plotting, 3D visualization, regular expressions, numerical operations, and Excel integration. Below is a list of required libraries:
- Pandas
- Matplotlib
- mplot3d
- re (Regular Expressions)
- numpy
- xlwings
To install all the required libraries, you can use the following pip commands:
pip install pandas matplotlib numpy xlwings
The re module is part of the Python standard library, so no additional installation is required for it.
Conveyors config:
On this sheet the parameters of the conveyor object are defined. Additionally you have a button called “show 3D plot” that uses python if you have it correctly configured to show you a preview on how the conveyor networks look so far as you progress with adding them.
- A: id: unique identifier of the conveyor.
- B: Network id: is the unique identifier of the network to which this conveyor belongs.
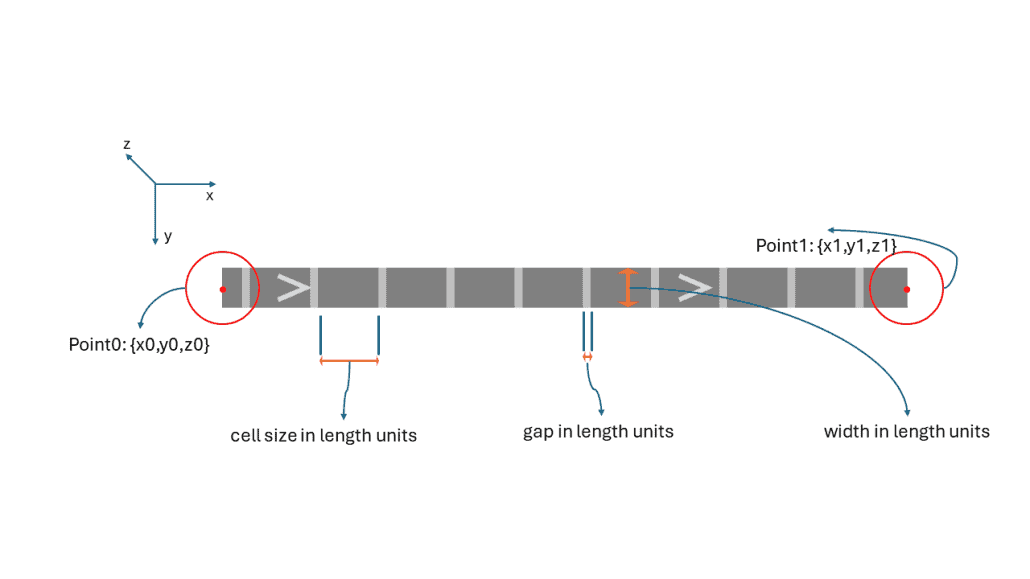
- C: Points in length units (see image below): all the points of the conveyor, where the first one is the origin, and the last one is the end of the conveyor. The coordinates can be either in meter or feet, as defined in General sheet.
Use this syntaxis: {{x0,y0,z0},{x1,y1,z1},{x2,y2,z2},…,{xn,yn,zn}}- Note that the order in which the points are written will define the movement direction of the conveyor and that this direction cannot be modified during run time.
- If the points define a loop conveyor, make sure to use the same start and end points.
- D: Type: three possible options: Cell, Belt & Roller.
- E: Gap in length units (see image below): size of the cell where the agent will be if type “Cell” is chosen. Length Units are defined in the General sheet.
- F: Cell size in length units (see image below): size of the cell where the agent will be if type “Cell” is chosen. Length Units are defined in the General sheet. If you are using a loop with cells, make sure the loop and the size of the cells and cell gaps (columns E and F) make sense, meaning that they fit with the length of the conveyor. If they don’t, our algorithm will calculate the gap size rounding to the nearest value of column E in which the sizes fit correctly. When you run the model, you will get a notification in the console with the gap size used.
- G: Width in length units (see image below): width of the conveyor. Length Units are defined in the General sheet.
- H: initial speed in length units per sec: initial speed of the conveyor in meters/second or feet/second.
- I: max speed in length units per sec: maximum speed of the conveyor in meters/second or feet per second.
- J: acceleration in length units per sec2: acceleration of the conveyor in meters/second^2 or feet/second^2.
- K: Color: color of the conveyor. Helps with the verification and validation of the model.
 Spurs config
This sheet defines the connection that exist between different conveyors using spurs.
- A: Id: unique identifier of the spur.
- B. Network id: is the unique identifier of the network to which this spur belongs.
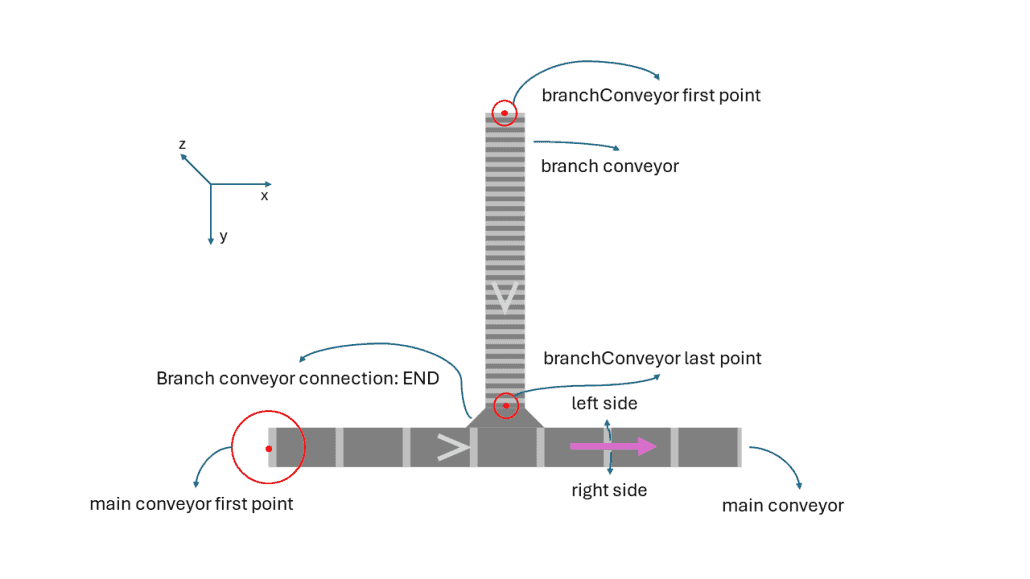
- C. branch conveyor (see image below): the id of the conveyor that is directly connected to this spur. The id of the conveyor is the one present in column A of the conveyors config sheet.
- D. main conveyor (see image below): the id of conveyor where the spur is attached. The id of the conveyor is the one present in column A of the conveyors config sheet.
- E. Color: the color of the spur, helps in the verification and validation of the model.
TransferTables config
- A. Id: transfer table unique identifier.
- B. Network id: is the unique identifier of the network to which this transfer table belongs.
- C. Paths: a map where the connection of the conveyors is defined. At least two conveyors are needed and a maximum of four can be defined. The keys of the map are the id of the conveyors, and the value is the point type where these conveyors are connected to the transfer table. Example:{conveyor1:end,conveyor2:end,conveyor3:begin}, this example defines a transfer table that has 3 connected conveyors, that starts at the end of the conveyor1 and conveyor2, and is connected to the begin of the conveyor3 (see image below)”
- D. switching delay sec: The time required to switch to another conveyor (in seconds).
- E. fill color: fill color of the shape.
- F. line color: line color of the shape.
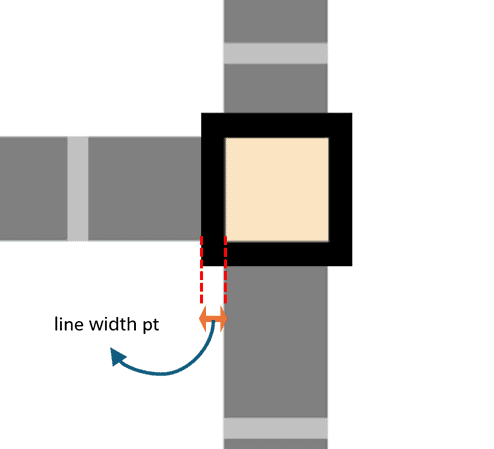
- G. line width pt: line width of the square (this is in pixels).
Sensors Config
The aim of this sheet is to define positions on conveyors that will be used as sensors in intersections, in order to create the release sequence of the agents based on their priority. Sensors are used in sorters in order to reroute and prioritize items and this is the place in which the sensors are defined. (For more details about sensors and how they are used in the simulation model, refer to the paragraph “Convergent Conveyors”)
- a. Id: unique identifier of the sensor.
- b. Network id: is the unique identifier of the network to which this sensor belongs
- c. Conveyor: the conveyor where the position will be located.
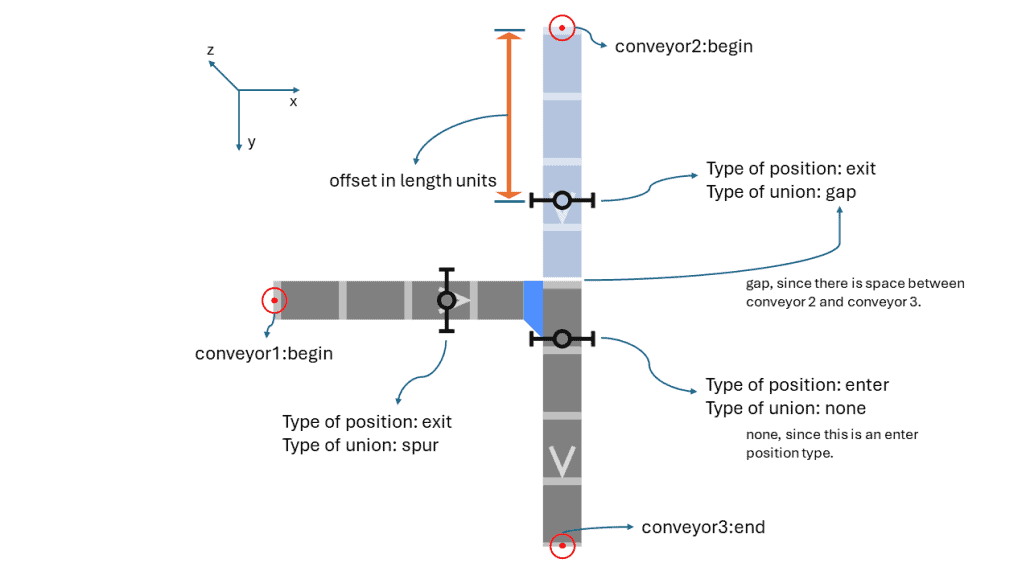
- d. offset in length units: This distance is from the first point of the conveyor.
- e. Type of position: only two possible options: enter and exit. This defines whether the sensor is used at the exit of a conveyor or at the entrance. Only one entrance and several exits can be used for an intersection.
- f. Intersection id: unique identifier of the intersection.
- g. Type of union: three options possible here:
- i. gap: if the type of position is exit, then this means that there is a space between the conveyor of this sensor and the enter conveyor.
- ii. spur: if the type of position is exit, then this means that the conveyor of this sensor is connected to the enter conveyor with a spur. Therefore, a spur must be created in Spurs config sheet.
- iii. none: if the type of position is “enter”, then this is the only viable option.
Routes
The routes are all the expected sequence of conveyors that the materials (agents) may follow
- a. Id: unique identifier of the sequence.
- b. Sequence: list of conveyors that the agent can go through. Use this syntax: {c1,c3,c5} specifying the conveyors ids and make sure to not add any spaces between the ids of the conveyors or next to the paratheses since this will cause an error.
Note: For all the ids described above that need to be indicated in the excel sheet, the names cannot contain any special character other than underscore “_”. This is the only acceptable character that can be used as part of the id names.
SpecialConveyorItem
In order to use all the features of this library, you will need to create your own agent that will move through the conveyors, but your agent will have to be an extension from the SpecialConveyorItem of this library, which is a Material Item type. For this you need to go to the advanced section of your agent type properties and do it there as is shown in the following image:
By extending from this special agent type, the agent has access to the following:
set_id(String id): defines the unique identifier of the agent in the case that you want to use HTTP features (next section).
priority: it is a double variable which represents the current priority of the agent, the higher the number the higher the priority.
setLength(double lengthInUnits, LengthUnits units): by default the agent is 1 meter long, when you create the agent you can set a new length for the agent.
setWidth(double lengthInUnits, LengthUnits units): by default the agent is 1 meter wide, when you create the agent you can set a new width for the agent.
setHeight(double lengthInUnits, LengthUnits units): by default the agent is 1 meter high, when you create the agent you can set a new height for the agent.
Of course you have to create you own agent animation, otherwise you will see nothing when running the simulation.
ConveyorNetworkSettings
This agent stores information about the settings of the conveyor networks. It helps with connecting the model with servers in case of the need to use HTTP connections (next section).
The parameters of this agent are the following:
- Use http connection: defines if the http connection will be used or not.
- Host: This is the domain name or IP address of the server where the resource resides. It identifies the specific server that will handle the HTTP request. For example, in the URL http://www.example.com:8080/index.html, www.example.com is the host.
- Port: This is the number that specifies the communication endpoint on the host. The port determines how the data is transmitted to the server. For example, in the URL http://www.example.com:8080/index.html, 8080 is the port.
- Print connection status: check as true if you want to see the status of the connection in the console.
HTTP connection & JSON
There are three functions that work as clients in a client-server relation: httpRequestAll, httpRequestCurrentSeq, httpRequestPriorities & httpRequestInject. These functions send a JSON file with the agents’ positions stored in materialPositions Collection and then the expected return depends on each specific function.
- httpRequestCurrentSeq():
Returns information with the new sequence of the agents and changes the current target conveyor. For example: {“Id”: “0”, “RouteId”: “5”, “Priority”: 10}, where Id means the agent unique identifier, RouteId is the next route for the agent and Priority is the new priority of the agent.
httpRequestPriorities():
- Returns the new priorities for the selected agents. Therefore, the function changes the priority of the agents dynamically. For example: {“Id”: “100”, “Priority”: 25}, sets the new priority of 25 for the agent with id “100”.
httpRequestInject(ConveyorNetworkLogic cnLogic, Object classInstance, String addPopulationMethodString, Object… agentArgs):
- Returns information related to the creation or injection of new agents in the conveyor network logic defined. For example, a JSON message from the server {“Id”: 2, “RouteId”: “2”, “Priority”: 20}, where Id is the unique identifier of the new agent to add to the conveyor network, RouteId is the route that this new agent will follow, and priority is the initial priority of the agent.
- The agents will be created based on the argument addPopulationMethodString which is the method that creates new agents in a population. For example, if you have a population called “pallets” due to an agent type Pallet, then the string method will be “add_pallets”. Consider that the agent Pallet must be an extension of the SpecialConveyorItem agent.
- If the addPopulationMethodString requires some initial arguments, you can define it on agentArgs argument with all the required parameters of the agent that you are initializing with the addPopulationMethodString. Consider that if no arguments are required, then the arguments related to agentArgs of the function can be omitted. Following the last example, if the agent Pallet has 2 parameters; SKU and Material, then you should add this values for those parameters delimited by commas (must be in the same order as if you were using the add_pallets() function).
- classInstance is the agent where the add population method exist, or in other words, where the population of the agents is. For example, if your pallets population is in main, and you are executing the http function directly from main, you should put this as classInstance.
- For example and using the last examples, if the Conveyor Network Logic where the agents will be injected is named conveyorNetworkLogic, the function would look something like this:
httpRequestInject(conveyorNetworkLogic, this, “add_pallets”, 123, “wood”); - If the agent has no parameters or the new agent must be initialized with the default parameter values, then would look like this:
httpRequestInject(conveyorNetworkLogic, this, “add_pallets”); - If addPopulationMethodString or classInstance is null, then the injected agent will be of type SpecialConveyorItem.
conveyorNetworkAnimation.httpRequestAll(ConveyorNetworkLogic cnLogic, Object classInstance, String addPopulationMethodString, Object… agentArgs):
Returns information from the three functions mentioned above. Therefore, the server’s response will be a map with the new sequences of certain agents, new priorities and the injection of others into the system. The response is a list that contains three lists of maps: newSeq, priority, and inject. The argument cnLogic, classInstance, addPopulationMethodString and agentArgs is used if a new injection is required (read the httpRequestInject function to understand this).
Steps to make this work
To make this work, these are the necessary steps:
- Be sure that the variable “id” of the agents is initialized. If not, initialize the agents id’s using id=String id on the agent. This is necessary in order to send the agent’s ids to the server.
- Run one of the functions depending on what you want to do:
- conveyorNetworkAnimation. httpRequestCurrentSeq
- conveyorNetworkAnimation.httpRequestInject
- conveyorNetworkAnimation.httpRequestPriorities
- conveyorNetworkAnimation.httpRequestAll
Notes:
- When using httpRequestCurrentSeq, make sure that the new sequence provided is feasible to be done considering the current conveyor where the agent currently is. If it is not, then you will have an error like this:
lang.RuntimeException: root.conveyorNetworkAgent.convey:
Path not found
Http server
To use the http functions that are incorporated in the library, you will need to set up a server using http protocol. The library has the client integrated, so it is the labor of the user to create its own server.
When using the http functions of this library, you will be sending data to the server, and it is the responsibility of the server to decide what to do with that data and return a JSON file to AnyLogic (client).
Check the example python file included in the library that works as a server. (python file main v4.py in the helper folder)
The following points will describe the second function of the server, which is related to the httpRequestCurrentSeq function in AnyLogic:
- @app.route(“/update-current-conveyor”, methods=[“POST”])
This line defines a route in a Flask application. Let’s break it down:- @app.route(…): This is a Flask decorator used to associate a specific URL with a Python function. In this case, the URL is “/update-current-conveyor”.
- methods=[“POST”]: This specifies that this route will only accept HTTP POST requests. POST requests are generally used to send data to the server.
- def update_currentConveyor(): This line defines a function named update_currentConveyor. This function will be executed when a POST request is made to the “/update-current-conveyor” route.
- data = request.get_json()
- request: This is a Flask object that contains all the data from the HTTP request made to the server.
- get_json(): This method is used to get the JSON data sent in the POST request. In this context, data will hold the data that the client has sent to the server in JSON format.
- Comments in the code:
- # create a random route: comment indicating that a route id should be defined here in order to return it later. It suggests that this part of the functionality is yet to be implemented by the user.
- response = [ … ]
Here, a list of dictionaries is defined, representing the response that will be sent back to the client. Each dictionary in the list contains:- “Id”: A string representing the unique identifier of the agent.
- “RouteId”: A string representing the identifier of a route.
- “Priority”: An integer indicating the priority of the route.
- return jsonify(response), 201
- jsonify(response): jsonify is a Flask function that converts the response list into an HTTP response in JSON format.
- 201: This is the HTTP status code indicating that the resource was successfully created. The 201-status code is commonly used for responses to POST requests that result in the creation of a resource.
Understanding this, the only part that must have the same format as it is described is the “response”. Since this is the JSON that AnyLogic will decode to do the requested changes.
Note that the server can be coded in any programming language, but the response must be sent as a JSON.
Circular Conveyor
There are some rules in order to create a circular or a closed conveyor:
- It is important that the first and final point of the conveyor are the same. Example: {{10, 10, 1}, {10, 15, 1}, {46, 15, 1}, {46, 10, 1}, {10, 10, 1}}.
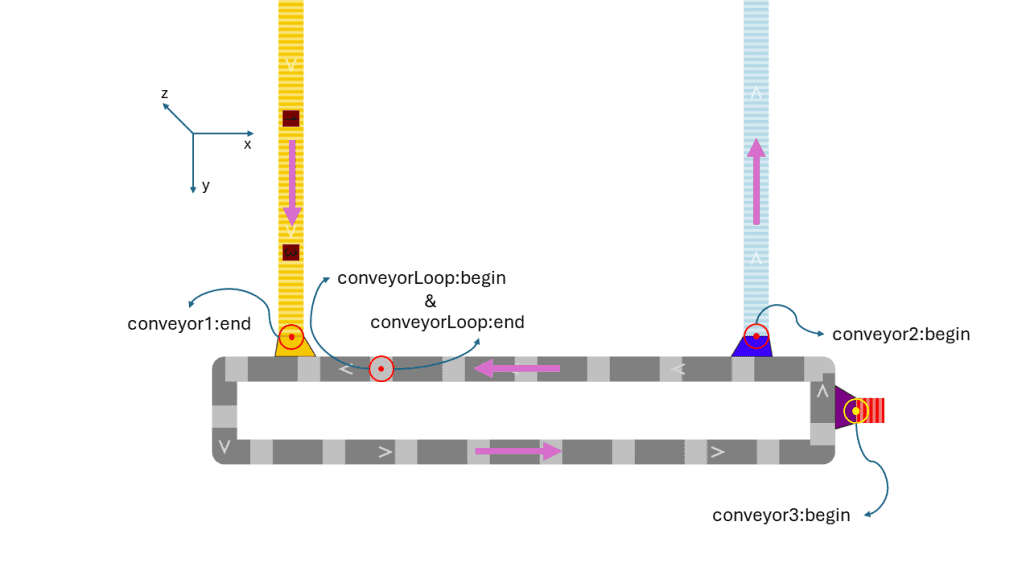
- For the cases when you have a circular conveyor with 2 straight conveyors branching from it such that these 2 straight conveyors have opposite directions, it is necessary that the vertex of the circular conveyor (the starting and ending point) is chosen along the part of the circular conveyor that is between the 2 straight branching conveyors. Example: the red circle of conveyorLoop: begin & end.
This way you can just define a sequence like this: {conveyor1,conveyor2} and the agent will go through the conveyor1, then will do half a loop on the circular conveyor (conveyorLoop) and will take the blue spur to end the sequence in the conveyor2. This is possible only because the starting and ending point of the loop conveyor is not in the route of the agent, otherwise, if the point is in the route, you will need to define the loop as part of the sequence.
If you want the agent to go one full loop in the loop, you just need to define the sequence like this: {conveyor1,conveyorLoop,conveyor2}. The result would be conveyor1, then a full loop plus half a loop and then conveyor2.
Note: if the last conveyor of a sequence in a route is a loop conveyor, then the agent will be in the loop forever, unless the httpRequestCurrentConv function is executed, changing the sequence of the agent.
Corvengent Conveyor
If two or more conveyors are merging in one single conveyor, the use of the priorities of the agents will be necessary to define the order or sequence of the agents. For that, the use of Sensors config sheet will be a must.
The positions on conveyor are the sensors that will help to define the sequence of the agents. Here is a quick example of how to configure a convergent point of conveyors:
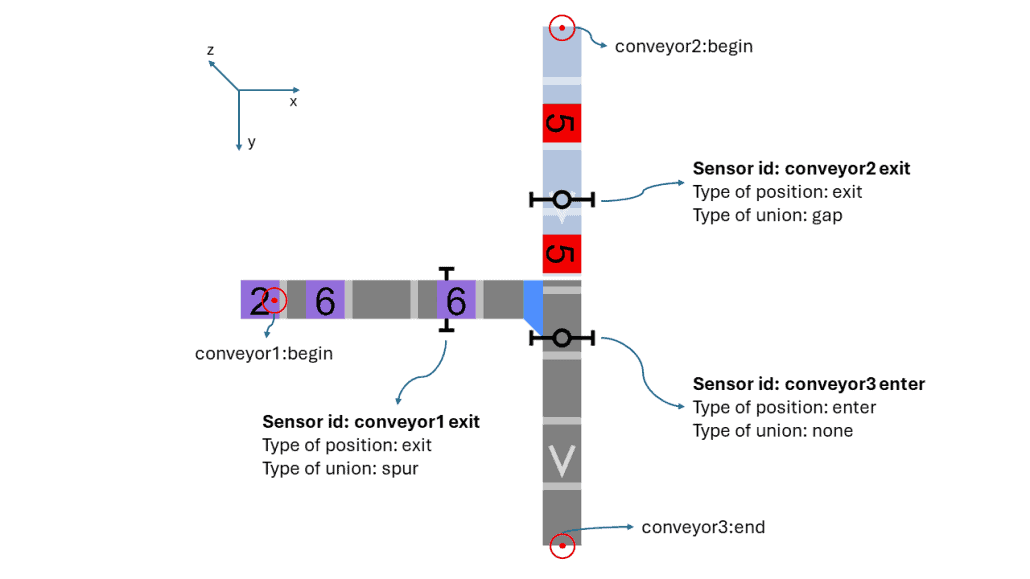
- In the Sensors config sheet, the sensors of the conveyors are defined, there are two conveyors merging in one. The intersection id is to define which sensors are related.
- The two conveyors that join at the point are conveyor1 and conveyor2, that is why both have exit as type of position.
- To use the priorities it is necessary to split the main conveyor (in this case conveyor 2 and conveyor3) in two parts, since this is the way to use the sensors.
- conveyor2 has a gap as type of union since there is a space between conveyor2 and conveyor3. In reality, this gap or space doesn’t exist, in fact this is just a single straight conveyor. However, in the configuration and accordingly the model, it is necessary to divide the conveyor into 2 parts at the intersection so that we can add the sensors accordingly. When dividing the straight conveyor in to 2 conveyors, the coordinates of the end of the first conveyor should be the same as the coordinates of the beginning of the second conveyor. This way the 2 conveyors will function as if they are one.
- In contrast, conveyor1 has a direct connection to the conveyor3 with a (blue) spur.
- In the example image, now that the purple agent with priority 6 went through the “conveyor1 exit” sensor of the conveyor1, the two red agents on conveyor2 must wait at the end of the conveyor, since the first agent of this conveyor has lower priority (5). After the first agent with priority 6 goes though the “conveyor3 enter” sensor in conveyor3, a signal will be sent to allow the agents on the conveyor2 to start moving, but note that the red agents will only move forward if the second purple agent with priority 6 hasn’t reached the “conveyor1 exit” sensor in conveyor1 yet.
Note that the offsets of the sensors must be consistent with the layout, here are a few things to consider:
- An enter sensor cannot have an offset equal to zero, since there will be no space to detect the new incoming agents, and the priorities in the intersection will not work.
- An enter sensor cannot be in the same line of the spur which provides agents from the branch conveyor. The sensor must be after the shape of the spur (see the following image)
- The offset of the sensors cannot be greater than the total length of the conveyor.
How to use the model
- First download the library (see the top of this documentation) along with the lib folder and save it somewhere safe.
- Inside Anylogic, add the Sorting Conveyors library to your palette using the + button on the palette tab, and find the sortingConveyors.jar file you downloaded… Always keep that .jar file in the same location, or you will run into issues.
Now when you create a model or if you want to use an existing model with this library:
- From the helper folder, place configMacroV excel file in your model folder (DO NOT change the name since this is the name used in the library. Also do not change the structure of the excel, or the tabs or the name of the tabs)
- If you have python installed, add preVisualizationScript.py from the helper folder to your model folder. This will be used by the Excel File as a macro to show a 3D plot of the conveyor system.
- Drag and drop the ConveyorNetworkSettings in your model. Configure the parameters as you need.
- Drag and drop the ConveyorNetworkAnimation in your model. Select the conveyorNetworkSettings agent.
- Drag and drop the ConveyorNetworkLogic in your model and connect it to others logic blocks. Can be multiple blocks of this type in the model.

- Configure the parameters of the conveyorNetworkLogic agent, selecting the conveyor network animation.
- Remember two important things:
- The agent that uses the conveyor network logic MUST extend from SpecialConveyorItem as explained previously.
- Before the agent enters the block, this function must be used: conveyorNetworkAnimation.updateCurrentSequence(SpecialConveyorItem agent, String sequenceId, double priority);
This is to initialize the essential parameters of the agent to be routed in the conveyor network. For instance if a source is connected to the conveyor network logic block, you can execute that code on the “on at exit” action.
- Run the model and enjoy.
Notes/recommendations
- Remember to use points for decimal numbers, commas are not allowed for these numbers.
- For unions, such as spurs or transfer tables, it is necessary to leave space between the involved conveyors. This is to provide the physical space needed to create the lines representing the spurs and transfer tables. In the following image three conveyors are connected to a transfer table, and the connecting points are not positioned in the same coordinates since the space between them is needed, since in this way the shape of the conveyor can be created.
- Additionally, for the spurs, the connection point of the branch conveyor must have enough space with respect to the main conveyor, considering the width of the main conveyor for this. We recommend positioning the connecting point of the branch conveyor at least half the width of the main conveyor away from the main conveyor. Check the following image.
- For the spurs, the connecting point of the branch conveyor must be pointing to any segment of the main conveyor that is between the first and last point of the main conveyor but cannot point right to the first or last point since the spur needs physical space to create the shape, therefore it is not allowed to position a spur at the start or end of a main conveyor.
F.A.Q.
I see the boxes overlapping in places where i have sensors
Sometimes can happen, in a gap union type where the sensors are used, that one agent has passed to the next conveyor but cannot go further because of a large queue of agents in this conveyor, and the agent that is behind goes to the end of the first conveyor. With that happening, it looks like both agents are one above the other. This is just a visual thing that has almost no operational implication. We will improve this in the future.
My exported model doesn’t work
When you export a model, it doesn’t require a license, as long as you exported it with a license (both for the cloud and java export). In order to export it, you should have run the simulation model at least one time in AnyLogic with internet on, which will generate a valid licenseKey.txt file (if you purchased a license). This file must be integrated in any exported version, and to do that you need to go to resources/data/licenseKey.txt properties and turn on “Resource is referrenced from user code”. This will allow the model to export the licenseKey.txt file, as you see in the following image:


